Showing posts with label crafting. Show all posts

Wednesday, May 8, 2013

Happy Happy Birthday!!

Yey! Our blog is One Year Old!!
 I know I am a wee bit behind as technically it was last week. opps! But it is never too late to celebrate!!
Here is a quick overview of our first year.
We have 15 followers, 127 posts, 442 comments and 5,597 page views from 10 different countries.
Not too bad for year one.
 
Our top five posts are:


To celebrate our anniversary month we are having a giveaway!!
 All you have to do is leave us a comment on which post over the past year was your favorite. And if you are the winner we will send a lovely handcrafted mystery gift to you!

Only one entry per person. Open to US residents only. Winners will be picked using a randomizer. Giveaway ends May 17th, 2013 at midnight.

Friday, March 29, 2013

Tie-Dyed Easter Eggs

 What is Easter with out colored eggs? Even though we don't usually color eggs every year, we don't let too much time lapse between colorings. To add a bit of interest last year, we tried tie-dying the eggs!
 It is actually a very simple technique. Perhaps a little messier then normal dying, but not too much. All you need is paper towels, rubber bands and egg dye. Wrap the paper towels around the egg, bunching and wrinkling the towel. Use the rubber bands to hold in place.
 As you can see there are many many ways to wrap the paper towel. Once the towel is secure to your liking, place the egg in a dish and pour spoonfuls of dye on it. The paper towel keeps the dye on the shell so it has a chance to color the egg. Wait until the paper towel is mostly dry or completely dry, depending on your patience and what affect you want.
 There are endless possibilities to tie-dying. Use one color.... two or three........ or all of them! Dye your egg first or leave it white.

Happy Easter!!

Wednesday, February 27, 2013

Give Your Medicine Cabinet a Facelift!

 I know this is not really super crafty. But I am so Excited about this project!! I really wanted to do this a while ago, but had to hunt around for wallpaper/contact paper to use.
So here are the details-
That polka dot stuff in the back of the cupboard is contact paper from Big Lots. It isn't the greatest stuff, a bit thin. But it was a fun pattern, a bit retro and matched the bathroom color scheme! I have had my eye out for wallpaper, old or new for some time. It was just way over my budget, or didn't come in big enough pieces. I thought about painting a design on with a stencil or stamping or just painting it a fun color. But that never happened, which was a good thing! It took about ten minutes to put up. The shelves are permanently in place, so we just used three pieces of contact paper. The nice thing was the contact paper was the perfect size width wise. All we had to do was cut it to heigth. It helps immensely to have another pair of hands! It is also very helpful to use all those wallpaper tricks, like only peel a small part away at a time and smooth it bit by bit.
It is amazing how it brightens and opens up the cabinet! And the best part? I have a whole roll of it still! So I can do the cabinet in the new house and drawers and maybe a shelf? And the linen closet could match too!


Wednesday, October 3, 2012

Reviving a Pair of Favorite Shoes

 My poor brown flats. Aren't they sad? The lining was coming out, the innersole was coming out, my feet stuck to them and I had to shove everything back in when I took my shoes off. But I was not ready to give up on them!! The outsides are still in great shape and they are my favorites! There had to be something I could do.....
 So I set out to put new lining in them!
First I took out the sad old linings, cutting the stitching around the labels to get them out. They look even sadder out of the shoes......
 From my fabric stash I found a pretty calico that went with the brown. I pinned the old lining to the fabric and cut new ones.
  Before gluing, I test fit the lining to make sure it was the right size. Just a little off the top, then it will be perfect!
I thought very hard about what glue to use, but in the end I was too lazy to go to the store and just ended up using Elmer's Craft Glue.
I used a generous amount of glue and spread it out evenly with my finger.
Starting at the heel edge, I smoothed the fabric onto the sole with my fingers, working my way up to the toes. Since the toe portion of the inner soles were already coming out, I popped it out to be able to work better. Once I had the lining smooth, I pushed the sole back in and made sure there wasn't any new wrinkles.
 Isn't the new fabric much more fun!  Now I just need to do the left shoe and let them dry for a few hours.
All ready to go stepping!!
I can't believe how good they look! Almost like getting a new pair.
Wasn't that easy? Start to finish it took me only 20 minutes. Do you have favorite pair of shoes that need to be revived?


Friday, September 14, 2012

Decoupage Collage


Decoupaging does not take a lot of thought or planning, just wandering about the house finding things to add. I had so much fun I had to make two!


Starting with a canvas covered board that I got at a craft store, I decoupaged on a piece of light blue mulberry paper for coor and texture. In my scrapbooking supplies I found a sweet old-fashined lady who looked like she enjoyed birds.


What really inspired me to begin this was my collection of bird fabric that will someday become a quilt. After I cut out the birds I felt the collage was still lacking something......
 
Well a tree of course! I painted that on with some acrylic paint from the crafting stash.
 
After arranging and re-arranging I decoupaged the birds and papers on, I think about four coats of the glue, letting them dry at least 2 hours between each coat. Instructions are on the bottle.
 
I dug around in the Christmas wrapping supplies for ribbon which I combined to use for hanging the art. I tried to fasten the ribbon on with the staple gun but it was out of staples. Then my husband pointed out that I would have stapled the art to the table..Saved from a a crisis!
 
I did miss one step in the pictures and that was when I painted words in a translucent silver paint, one picture says Pretty Birds, the other says Love and has an X for a kiss of course.

 
Can't you just hear the birds chirping?

Tuesday, August 28, 2012

Live, Love and Laugh

For those days when you need a bit of extra cheer, or maybe want to get the party, these flags are fun and versatile. They look great on muffins, cupcakes, or maybe even to top off your banana split. You don't have to limit youself to decorating food, pop one in the mail to a friend, bunch them in a bouquet in a tiny glass....
     All you need is a few toothpicks, ribbon and a dab of glue! 


 This large piece of cake looks like a ship ready to sail away......does anyone have a fork?


Saturday, August 25, 2012

That's So Corny!

What could be better than a few ears of lovely corn to start your autumn decoration? Scatter them on the table for your Thanksgiving feast or hang them in a group on your door, here they look so comfortable in my basket by the door. The best part is that they won't get old and moldy.


  It started when I saw a few cloth ears of corn at the local craft store. They were made out of different patterns of fabric but I liked this upholstry fabric that was just the right texture, only it was brown and tan. I lightly brushed yellow acrylic paint on the fabric, I didn't care if it was blotchy in places, going for a very organic look.


In keeping with the organic style, and also very easy, I didn't use any kind of pattern for the corn, each and every ear that grows is different anyway. I just cut each piece freehand and machine sewed as I went along, leaving the top open for turning and stuffing. I did use a stronger waxed thread, mostly because I wanted to use it up and also it was a little heavier for the fabric.


Leftover quilt batting was cut into strips for the stuffing, it was a great way to use up those pieces trimmed from the edges of quilts. I turned the top edge to the inside and did a quick running stitch to close it up, it left a small hole, perfect for inserting the raffia for the top.


 After wrapping the raffia in loops around my four fingers, I stuffed one end in the corn top, then I poked my needled through the raffia, securing it to the fabric on the other side. I went back and forth with the needle through the raffia about eight times so it wouldn't pull out.

Then I clipped the top of the raffia so it would feather out, and crunched it in my hands to create a texture.


Ready for a feast!


Monday, August 20, 2012

Partridge Pillowcase

We do have a mania for old sitcoms and for a while it was The Partridge Family. When I saw the crazy daisy fabric, I instantly thought of Shirley Jones and her gang. It took me a long time to decide what to make out of this fabric, but I decided if I loved it and just wanted to stare at it, a pillowcase would be useful and accomplish that idea.


I had to sew the pink edge on three or four times before I figured out how to get it on with no raw edge to unravel and create a mass of strings after washing. I finally decided to fold the edge under on the wrong side. Now I just need to make my husband a matching one with a blue edge. How could he not wake up in love?


Sunday, August 5, 2012

Embroidery Successful!

Embroidery is such a beautiful and elegant way to dress up a simple towel, pillowcase, shirt etc. I have long admired the texture and simplicity of it but only recently have I successfully mastered the art of embroidering. Believe me, many sorrowful projects have been discarded on this road to success. It seemed like every weekend this summer there was a wedding or a shower taking place, I whipped up a stack of these flour sack towels for gifts and enjoyed every minute of it!


 I was always told that a truly good piece of embroidery had a neat and tidy back. I am proud to show that mine is relatively neat. I used the Basic Outline Stitch on all these, on the radishes/turnips I did some longer satin-type stitches. It's really pretty simple once you get the hang of the stitch and you can easily take it out and do it again if a certain stitch doesn't look right. And of course vegetables are always a good theme for a kitchen!


I think I need to make myself some, don't they just match my table-cloth perfectly?

Friday, July 13, 2012

Almost Instant Cupcake Decorations

 I am sure you can guess when we made these?! At the last minute we decided to have patriotic cupcakes, but didn't realize the only color of sugar we had was red. Quick thinking was required!
Since I didn't relish a trip to the store, I dug around in the craft supplies and found some blue scrap booking paper, a small star cookie cutter and toothpicks from the kitchen. I then traced and cut out a bunch of stars and sandwiched the toothpicks between two stars securing with double-sided tape.
WA-la!! Instant cupcake decorations!
You could do little yellow ducks for a baby shower or flowers for a birthday or cows, dogs, letters or numbers.....the possibilities are limitless.

Monday, June 18, 2012

Book Reveiw-501 Decorating Ideas Under $100

You know how after a few years your decorating seams a little stale? We have a few rooms like that. I am hoping by the end of the summer to have perked then up a little. They just need a little something, not a complete "make-over", just a little "make-up". Maybe a few new highlighting colors, a little sparkle and polish. So that being said, I have been on the look out for ideas. Recently I came across this book, 501 Decorating Ideas Under $100. It is so Inspiring!! Fabulous ideas that you actually could see working in your home. And the best thing? It is a Do-It-Your-Self book! Our favorite kind!

"Classic bird prints can be pricey once they're professionally matted and framed. We used pages from a book and mounted them in inexpensive clip-edge frames (backed with scrapbook paper when needed to get the right size.)" 
The first idea that caught my eye. I love the clean look of framing this way.
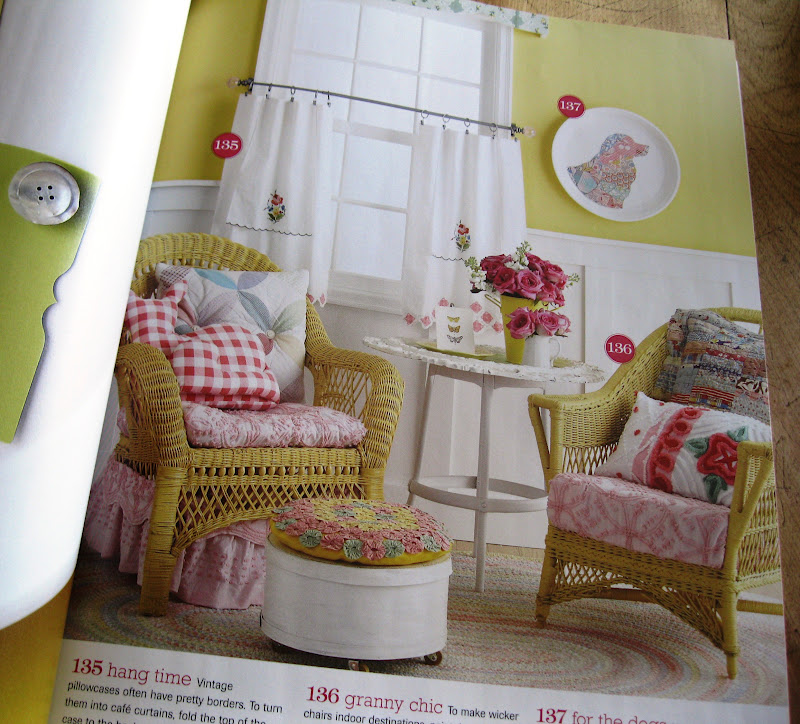
Vintage pillowcases turned into cafe curtains, handmade yo-yos on a foot stool.
Our favorite kitchen look! So bright and cheerful.
A vintage tablecloth made into a curtain, tin ceiling tiles to disguise the refrigerator, drawer pulls on backs of chairs for added interest, an old chair taken apart and used for a towel rack.
.

 A few more of our favorite ideas. I love how they have taken objects out of their usual environment and re-purposed them.

Now that I have all these ideas rolling around in my head, time to get decorating!!